Showing posts with label Craft. Show all posts

Back to School DIY Bling Galaxy Backpack

CAM00315

As I was going through my youtube feed and seeing what was New, I came across this Idea

DIY Galaxy Backpack You take a black backpack and paint Galaxies all over it.

I thought, wow, now that’s a neat idea. So I decided to comment on the video and tell my daughter,

“We’re going to make a one of a kind backpack for you going back to school”. She agreed to do it.

Of course when I do a dupe of something I have to put my own spin on it!

So I added Glitter and Bling. This isn’t a full tutorial, but rather a DIY Instructional Post. Enjoy!!!


Supplies: 

A Plain Black Backpack (as shown above, but painted), I got mine at Walmart for $8.88.

2 Towels and 1 Washcloth for stuffing the Backpack makes for an easy surface to paint onto..


CAM00284You’ll also need Tulips Soft Velveteen fabric paint, In Colors White, Grape, Blue, and Azalea (Pink).

I purchased these in the t-shirt painting section at Michaels for about $1.50 each (not bad).


CAM00285I used Plastic snack bags for the paint to sponge onto the backpack.


CAM00287   I used a big sheet of wax paper to dab off excess paint.

I then used one yellow kitchen sponge $.92 at Walmart, that I cut into two halves.

Cut the edges off to make it easier to work with and used each corner for a different color.

I also used 2 fine detailed paint brushes, which I purchased a while ago at Michaels in a

set for about $8.00 ?? They are to nice to work with, very Ergonomic for the hands..


CAM00291    I had some glitter on hand and have been wanting to use my daughters Aqua,

Crystazzi Flatback Crystals also purchased at Michaels, which I have used clear flatbacks before

in my tutorial Bling out your last years sandals.

 CAM00294 A close up of the pretty glitter Aqua, Magenta, and Purple


CAM00323We also used bigger generic Crystal gems that were about $1.00 at Michaels.


CAM00288Directions: So we proceeded to load up the sponges with one color at a time.

Then we would dab as much off as we could onto the piece of wax paper, when applying,

you almost want the paint to be rubbed on dry and not splotchy or clumpy

to give each galaxy softness and depth. We used a mixture of Grape and white mixed together first,

then Blue and white, then Azalea Pink and white. We made little clusters just dabbing on a little at a time,

we’d turn the sponge and onto the next color and so on!


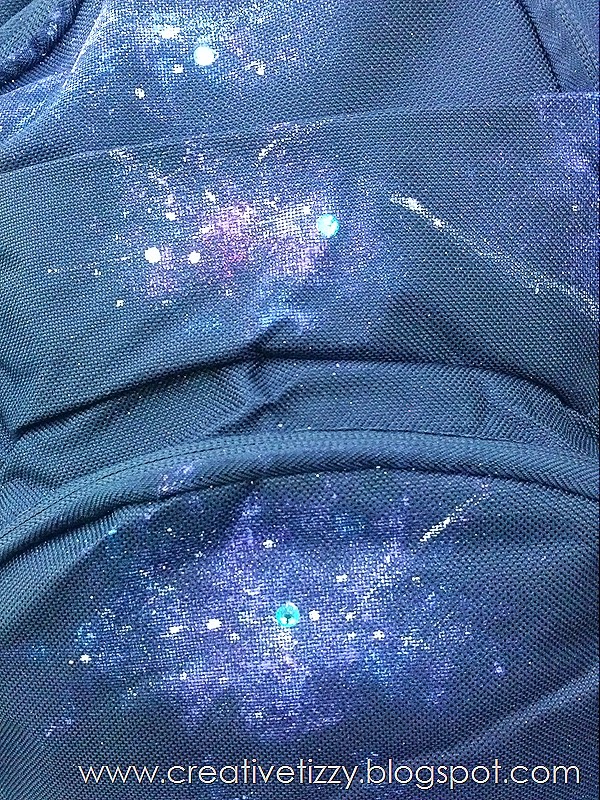
CAM00302  Here’s a close up shot of the Galaxy Clusters, yours will look different than mine but you get the idea.


CAM00304Stand back every so often and take a look at how its coming along.

You may need to add more of a color as you go.


CAM00305Also make sure that you randomly dab on the paint twisting your hand as you go,

so that you don’t get the same pattern on each galaxy.


CAM00327We used the paintbrush ends to dab on stars in a circular pattern to simulate a galaxy of stars.

Again, very random or you could paint on a constellation like the Big Dipper,

which my daughter did at the very bottom right. Do you see it  ;)


CAM00331      We also dry brushed on some shooting stars and simulated gaseous explosions,

as seen in space telescopes. We dabbed our finger into some glitter

and before the paint was completely dry, spread it across each galaxy for twinkle.


CAM00297Then we added the Crystazzi flatbacks with Nail Glue (my go to glue for applying gems).


 CAM00314Here is what the final product looks like in Daylight.

CAM00313I have to admit, My daughter and I were quite impressed with the job we did and

one of the best parts was it was sooo easy. Plus we had a nice Mother/Daughter bonding time.

Just let go and have fun! And that’s just what we did!!


CAM00316 Here is a close up of one of the generic crystals from Michaels @ $1.00, you can’t beat that.


CAM00317And another Pretty Blue one, a Planet or a Blue Sun, who knows it’s Outer Space!!


CAM00320CAM00322 Now we chose to go a little heavier with paint on the arm straps, because the material is heavier in nature.


CAM00318CAM00319Then we glued the bigger Gems onto the Zipper Pulls, those babies aren’t coming off, I tell ya!!

So let me know if you try this project out and send me a link to your blog post or pics.

I can’t wait till my daughter goes to school to hear what comments she’ll get on her New Backpack!!

This project is rated EZ on the DIY scale and is suitable for ages 5 and above with supervision.


What back to school projects have you been working on

and if you like this project leave me some comment Love!!

Don’t forget to follow me on Twitter, Pinterest, and Google+

Check out my sidebar for all social media…

XOXO,

Christina


Quote of the Day:
Work keeps us from three great evils, boredom, vice and need.
--François Marie Arouet Voltaire


Have Fun, Stress Less When Vacationing with the Kids ~Post 3, 9 Final Tips

If you would like to follow along, there are two posts to this series. Have Fun Stress Less when vacationing with the kids Post 1, and Have Fun Stress Less when vacationing with the kids Post 2.

2012-08-11_19-39-50_708

 Myrtle Beach, South Carolina Pier August 2012 Vacation

  1. When at your hotel keep clothes in suitcases. Why?? because it lessens what you have to do when you go to leave.
  2. Use various Apps to get to know your area. Urban Spoon, Foodspotting, Yelp all are great for getting to know restaurants and what is good where you’ll be vacationing. Shopkick for deals, Raining Hot coupons and your local pharmacies for Apps to getting great deals when far from home.
  3. Use coupons or online discount codes/ such as retailmenot.com and ebates.com for hotel/driving/shopping etc.
  4. Grab a postcard for the family back home and send your greetings to them. Or do as we do, bring back some Salt Water Taffy. When we go to the shore we usually get Dolles on the boardwalk.
  5. Collect Souvenirs of the trip. Examples could be ticket stubs, wrist bands, photos, seashells, sharks teeth, sand, postcards.
  6. Make a project from those Souvenirs. Get a recycled jar and fill it with the items you collected and you’ll have a great memory to commemorate your spectacular fun filled vacation.
  7. Before you book hotel find out what is available at the hotel for kids to do, Lazy River, Pool, Hot Tub, Games etc.
  8. When you are finally vacationing, buy things as needed when your there. In case you forgot some things, don’t fret. It’s not like your going to a remote Island or anything, or are you?? Well then tweet those pics…
  9. Before you leave the house make sure you clean it. Make all beds, take care of trash, run the dishwasher for the last time and empty fridge of things that will go bad. Use Glade Plugins to make your rooms stay fresh. When we came back home. I walked in my home and everything was done. Smelled fresh and not stale or dank. It was nice to know that I just needed to do the laundry and put the rest of the stuff away. But because I was so efficient from the start that took me an hour to do. Life’s Good!!

All in all realize that with a little preparation ahead of time, you can save yourself mounds of time and trouble from getting overwhelmed, to actually having fun and enjoying your vacation. Now school is back in full swing, so it’s “Back to Life, Back to Reality”, the song is playing in my head right now. Back to a brand new schedule for the year. Leave a some Comment Love, Yeah!! ~Christina

Happy Valentines Day/Valentines Goody Bags for Kids Tutorial +Hubby Gift

SAM_0755

Hi Everyone hope you have a great day today. Here’s The Valentines Treat Bags I made for my kids today. Took about an hour if that. Here are the supplies you need:

SAM_0644

I shopped at Walmart’s Seasonal $1 scrapbooking section, its different in every Walmart you go to, but you need to find it, saves time and money.

I purchased: 4 stuffed animals $2.97 each, 4 bags $.25 cents each, Studio Cards $.97, Studio Cupid Stamper, $.97, Studio Glitter Glue $.97, Studio Ribbon $1.00, Studio Stamps and Stamper each $1.00, 2 Sheets Black Cardstock (already had), 3 Sharpies 1 Black, 1 Pink, 1 Red, 8 Mardi Gras Necklaces (Party Section) $1.00, Hershey’s Kisses $3.00, Marshmallow Hearts $2.00. Other Items you need are Scissors and Glue Stick. Oh and the items on the Right are for my hubbys gift.

SAM_0647 - Copy SAM_0648 SAM_0662 SAM_0668  SAM_0667 SAM_0656

So Lets get started.

1. I First laid out the ribbon over the 4 bags measuring the top and bottoms and cutting the ribbon according to width of bag. 

SAM_0684 SAM_0689

SAM_0691 SAM_0692

2. I then pasted the ribbon strips to the top and bottom edges of the bags.

SAM_0693 SAM_0696

SAM_0698 SAM_0700

3. Next, I used the Cupid Punch on Black Cardstock to punch out about 12 Cupids, they are so tiny and cute…

SAM_0705 SAM_0706

SAM_0708

4. I then applied the mini cupids to the bags with a glue stick. I laid them on the glue stick then slid them off with my fingers to apply the glue to the underside. Then I sprinkled them all over the bags randomly.

SAM_0710 SAM_0709 SAM_0712 SAM_0713

5. I used the Valentines Stamps and stamped them in Black Ink onto the bags.

SAM_0714 SAM_0716 SAM_0717 SAM_0718

SAM_0719

6. I attached the card with glue stick to the bag directly, wrote my sentiments on the front of the card and inside. I also put a tad of glue on the inside so that the card would stay shut.

SAM_0720 SAM_0721 SAM_0722 SAM_0724 SAM_0725

7. I then decorated all of the little black cupids wings with Glitter Glue.

SAM_0726 SAM_0727

8. I Filled the bags up with the Goodies I got them. 

SAM_0735  SAM_0736 SAM_0738 SAM_0743 SAM_0745 SAM_0740

So Here’s the finished Product.

SAM_0746

I had fun with this and it was under $20 for 4 kids and they’ll appreciate that I took the time out to do it for them. I love my kids sooo much. Here’s what I got my hubby for Valentine’s Day, just gave it to him at lunch.

SAM_0748

I gave him XOXOXO post-it notes so that he could write love notes back to me, see ladies a gift that keeps on giving. I reused the bag for the cards for the rest of his candy.

There is a card that I wrote this on the inside:

SAM_0754 

We’re going out for dinner and a movie this Friday night. We normally don’t go anywhere on Valentine’s Day because I loathe the crowds and waiting in line, so we either go the weekend before or after. Thanks for reading, and Happy Valentine’s Day to you ALL!!!

Related Posts Plugin for WordPress, Blogger...